Showing posts with label Other Cooks n Bakes. Show all posts

Thursday, June 13, 2013

Oven Baked Vegetables

Cutting off oil as much as I can from our foods has become a routine ever since I got my OTG. I still remember the days when we were in search of an OTG that would suit our kitchen, that would be best for us. 'A' was fed up with my regular routine to all electronics shops on weekends and that too during the final days of pregnancy. He used to give me queer looks when I got dressed up to go to the shops. "Why don't you catch some rest and lets get the OTG after the baby arrives?". Bet he knew the return answer he would get cos he would walk away away silently to get dressed up.

As I said, I have tried to bake things whenever I can, so that oil can take a backseat in our daily food. So I baked some veggies not for our evening snack but for our dinner. Wraps, sandwiches and many more ideas were there and without a second thought I baked them. They were good~ in fact too good that just as the second batch was slid in, I started popping the cooled first batch one by one... I saved some though for our dinner and turned them into a light yet filling dinner. Do check out my coming posts to know what was cooked.

~*What U Need*~
Potatoes - 1(medium)
Carrots - 1
Baby Corn - 2
Capsicum - 1
Olive Oil - 1 tsp
Salt - to taste
Pepper powder - 1/4 tsp
Chilli Powder - 1/2 tsp
Italian seasoning - 1/2 tsp

How I Made it:
Cut all the vegetables as desired. I cut them into 1/4 inch pieces. Preheat oven to 220 C. Line a baking sheet with aluminum foil, keep aside. Mix all ingredients till the vegetables are evenly coated. Arrange in a single layer on the baking pan. Bake for about 10 minutes. Remove, turn the pieces over and bake for another 10 mins.

Do wait for my next post to see what I did with my baked veggies.

So thats it Folks...
With Love,

Signs off!!!

Interested!!! Click to read more...

Tuesday, February 5, 2013

Banana Bread Pudding with Nutella Swirl & Chocolate Sauce

Bread puddings are one dessert which are easy to put together and tastes sensational when served with a dollop of ice cream or whipped cream or vanilla mascarpone cream. My first attempt in baking a bread pudding was long back, when I was newly married. Quite a novice Armed with zero baking skills, I tried the pudding just because we had a microwave-convection oven in our in-laws house. I had a 13-inch baking pan and just one cup of pudding batter to fill it. Donot imagine till what level the batter was in the dish. And to those who imagined, it just peeped from the floor of the pan. That was not the only mistake that I did. I baked the pudding for the time the recipe called for and with such a big baking dish and such little batter I should have cut down on the time but I didn't. I didnt check for doneness in the middle, I simply and blindly baked. Thanks to god it didn't burn. And I don't want to talk about how the pudding tasted. It was good in taste but the texture ~ not soft neither hard... it was rubbery. End result ~ I vowed that I would never bake in my life.

But now I am happy that I changed my decision. Baking soothes me and my soul these days. I bake when I am happy, I bake when I am sad and these days, I don't need a reason to bake. I had my own downs when it comes to baking, never an up in my early days. But lessons have been learnt and I am starting to understand the science behind baking.

Now this pudding, its a simple one if you follow the recipe to the 'T'. I would say its a beginner's keeper. Its just making the custard, soaking the bread slices, putting em together and then baking. We had it for our weekend breakfast brunch, a lazy late morning breakfast and it was just perfect ~ not too sweet and not too bland. 'A' skipped the chocolate sauce but I would say donot skip it if you need something chocolate in everything you eat ~ 'like me'

~*What U Need*~
Milk - 1/2 + 1/4 cup
Demerera Sugar - 1 1/2 tbsp
Cinnamon - 1/8 tsp
Egg - 1
Day old bread slices - 2 cups, cubed
Ripe banana - 1 / Mashed Banana - 1/2 cup

Nutella - 2 tbsp
Butter - 1 tbsp

For the chocolate sauce
Dark chocolate - 50g
Fresh cream - 3 tbsp
Powdered sugar - 2 tbsp
Milk - to bring it to consistency

How I Made it:
Soak the bread slices in 1/2 cup milk. Mash the banana with a fork. Take cinnamon, demerera sugar in a bowl. Add egg and combine well.

Add 1/4 cup milk and banana and whisk well.

In a greased pan, arrange the soaked bread slices. Pour the custard over the bread slices.

Heat the nutella with butter over double boiler. Pour this over the bread and swirl with a knife. Bake @ 175 C for 30-40 mins till the top turns brown.

For the chocolate sauce, microwave all the ingredients for 30 secs. Whisk till smooth and shiny. If its too thick, then whisk in some milk to bring it to pouring consistency. When serving pour the chocolate sauce over the bread pudding and serve.

For best results, serve warm out of oven.

** My Notes:
** Once out of the oven, the pudding looks so puffed up but it falls once it starts to cool. Don't panic or don't get put off ~ that is how it works.
** You could add some dark chocolate chunks too
** Nuts, they give a good crunch too

So thats it Folks...
With Love,

Signs off!!!

Interested!!! Click to read more...

Thursday, January 31, 2013

Tandoori Gobi ~ Baked Version

Tandoored items have always been my favorite, the all-time being twice basted Tandoori chicken. The juicy and spicy chicken along with the crispy skin is a perfect accompaniment for naans or kulchas.
Its not only tandoored varieties but anything with a smoked flavor falls under the favie category. So when I had some cauliflower florets and the tummy was craving for some healthy evening snack I decided to try the veggie version. I served it with sauce but the mint-coriander-yogurt dip would have been the best.

This makes a great topping for pizzas or as a great filling for frankies or wraps.

~*What U Need*~
Cauliflower florets - 1/2 cup
Hung curd / Greek Yogurt - 1/4 cup
Red Chilli powder - 1/4 tsp
Ginger garlic paste - 1/2 tsp
Lemon juice - 1/2 tsp
Olive oil - 1 tsp
Salt - to taste
Cumin powder - a big pinch
Chicken Kebab / Tandoori masala - 1/2 tbsp

How I made it:
Soak the cauliflower florets in salted hot water for 5-10 mins. Drain water completely and set aside. In a large mixing bowl, mix all the other ingredients together, add the cauliflower florets and coat evenly. Refrigerate this for 2-3 hours.
Preheat oven to 220 C. Line a aluminum foil over a baking tray, arrange the marinated cauliflower florets and bake for 20-25 minutes. Turn the florets on both sides twice while baking.

Serve hot with sauce!!!

So thats it Folks...
With Love,

Signs off!!!

Interested!!! Click to read more...

Thursday, December 20, 2012

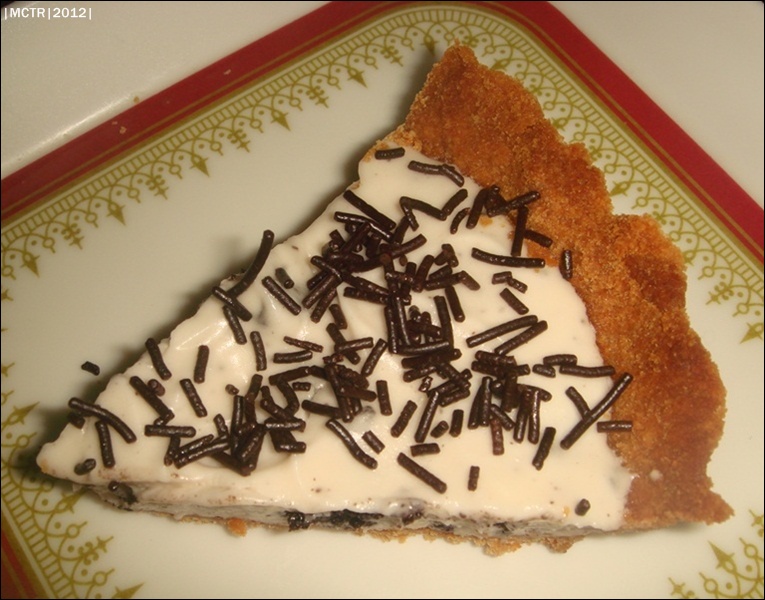
White Chocolate Oreo Cookie Mousse Pie | Easy Dessert Ideas

Ask Mr.A which is his favorite of my cooking, he won't give a second thought in saying "the melt-in-the-mouth chocolate mousse pie". He loves it to the core and whenever I ask him "Do you want me to make anything special for you?", he just asks me to make THE pie. Yes, he calls it "the" pie to give it that extra credit.


A melt in the mouth white chocolate mousse with itsy-bitsy oreo crumbles all together in a (digestive) cookie base

Now that I have made the same pie countless times, I have started experimenting by incorporating new elements and different flavors in the mousse. And that is how I came up with this decadent dessert. I would say it was too sweet and not-my-kind... but it was fit for the huss who is an absolute sweet- tooth mouth. This was made sometime back and was re-visited again to be improved as Peanut Butter Mousse Oreo-Crust Pie which I made for our anniversary. He was delighted with the flavor variation and with him being a PB fan, it has become his favorite now.

Make this easy peesy pie when you are running out of time and when you have friends over. You can make this the day before also and chill it overnight.

~*What U Need*~
For White Chocolate Oreo Cookie Mousse
White chocolate, melted - 1/4 cup
Powdered Sugar - 2 tbsp
Fresh cream - 3/4 + 1/2 cup
Oreo cookies - 5 to 6, chopped

For Cookie Base
Digestive biscuits - 1 packet
Butter - 2 - 3 tbsp

Chocolate vermicelli - to garnish

How I Made it:
Cookie Base:

Blitz the digestive biscuits along with the butter and sugar. Adding the sugar is purely optional. You can do this if you are a complete sweet-tooth. Else skip it. I skipped adding sugar. Press this dough into a tart pan firmly. Bake it for 10 mins or till it turns golden brown.

White Chocolate Oreo Mousse:
Chill the mixer blades and bowl at least for half an hour. Whip 3/4 cup of the cream adding the sugar slowly and increasing the speed gradually till it stands in peaks.
Melt white cooking chocolate using double boiler or in the microwave oven at high for 1 minute checking every 10 seconds. While still warm, add the 1/2 cup cream, and combine well. Add the whipped cream and fold in gently. Add the chopped oreo cookies and fold.
Dump the mousse onto the cookie base and level it. Refrigerate for 2-4 hours.

Slice and Serve!!! When serving, sprinkle chocolate vermicelli on top or crumbled oreo cookies.

So thats it Folks...
With Love,

Signs off!!!

Interested!!! Click to read more...

Monday, June 18, 2012

Mango Crumble

I had been coming across a lot of crumble recipes lately, the major core ingredients being apples and/or pears. I wanted to try this out with a different fruit and so used the king of all fruits with the mango season in full bloom. Sometimes less sweet mangoes were picked up from the market and so, rather than stuffing my mouth with them, I started trying desserts out of the stock.

The recipe in question was an outcome of a lonely girl taking a day off from work rumbling through the pantry ingredients due to her sudden sweet-tooth mood swing to make herself a yummy dessert with less & little ingredients and time. That was when she decided to make a mango crumble - a minimalistic yet moist n crunchy dessert. She would say that the combination was a hit to the palate with the crunchy sweet n flavorful crumbles complimented well by the mushy mango. :) And yeah I did this when I was pregnant and going to work.

Serves - 4
~*What U Need*~
For the Filling:
Ripe Alphonso mango - 1(Big)
Sugar - 2 tbsp
Lemon Juice - 1/2 tsp
Cardamom powder - 1/4 tsp

For the Crumble topping:
All Purpose Flour - 3/4 Cup
Oats - 1/2 Cup + 1 tbsp
Cinnamon Powder - a generous pinch
Salt - a pinch
Sugar - 2 tbsp
Butter - 2 tbsp
Milk - 2 tbsp

How I made it:
Peel and chop the mangoes into chunks. Now mix the mango with the sugar, elaichi powder and lemon juice and heat over slow heat till the sugar dissolves well and forms a semi-mushy mixture. You should be able to see visible mango chunks.
Preheat the oven to 350 F/ 170 C. Grease ur ramekins with butter. Half fill the ramekins with the mixture.
In a mixing bowl, add the flour, oats, cinnamon powder and sugar and combine well. Add the butter and start mixing with your fingertips so that you get a crumbly mixture.
Slowly sprinkle milk and mix with your fingertips to form crumbles. Do not knead into a dough.
Sprinkle this crumble on top of the mango mixture evenly. Gently pat down the crumble.

Bake this for 30 - 35 minutes or until the top becomes golden brown in color. I made this in MW convection mode and baked it for 15 mins.

Cool down for few minutes and enjoy with Vanilla ice cream or plain.

So thats it Folks...
With Love,

Signs off!!!

Interested!!! Click to read more...

Tuesday, March 27, 2012

Oven Baked Sweet Potato Fries

When I was a kid, amma used to make us french fries for our after-school snack. Those were days when we indulged in all kind of oily and fatty foods without a second thought. But these days whenever I think of frying something, my first concern would be the family's health. Can I afford frying something for the in-laws without any concern of their age and so, I just try to restrain me from deep frying anything whenever I can.

An occasional fry tempts me and the huss but when I find an alternate option to that and suggest it, he usually opts for the healthier version. So when I made these baked sweet potato fries for our weekend tea-time, I was glad to see him happily munching on these.

~*What U Need*~
Sweet potatoes - 2(medium)
Olive Oil - 1 tsp
Salt - to taste
Pepper powder - 1/4 tsp
Chilli Powder - 1/2 tsp
Italian seasoning - 1/2 tsp


How I Made it:
Peel and cut the sweet potatoes as desired. The thinner, the crunchier. Preheat oven to 220 C. Line a baking sheet with aluminum foil, keep aside. Mix all ingredients till the potatoes are evenly coated. Arrange the fries in a single layer on the baking pan.
Bake for about 10 minutes. Remove, turn the pieces over and bake for another 10 mins.

Serve with ur favorite dip!!!

So thats it Folks...
With Love,

Signs off!!!

Interested!!! Click to read more...

Wednesday, February 29, 2012

Granola Bars | Any-time Crunchie Munchies

I haven’t tried store brought granola bars till date mainly because I am not happy with the picture covers or I am not sure on the taste of the combination of flavors. To me oats has to made into porridge, cornflakes has to be had with milk and honey has to be licked off the bottle. So it all drills down to me not buying granola bars.

When I came across this Granola bars recipe @ Sharmis passions, I had this tempting urge to make some mainly because I was in control of the recipe and secondly it seemed so simple and her pictures where so tempting… I halved her recipe as this was my first time but I am totally in love with the bars that I will be calling the original recipe next time.

Recipe adapted from Sharmis Passions
~*What U Need*~
Quick cooking oats – ½ cup
Cornflakes – 1/8 cup
Honey – ¼ cup
Butter – ½ tbsp
Sugar – ½ tbsp
Water – ½ tbsp
Vanilla essence – ¼ tsp (optional)

Nuts & Dry Fruits:
Almonds – 3 chopped finely
Walnut – 1 tbsp of broken pieces
Golden, black raisins and Dates – 1/8 cup

The combined volume of almonds, walnuts, golden and black raisins and dates should be ¼ cup

How I Made It:
Dry roast oats, cornflakes, nuts and dry fruits in a pan separately until a nutty flavor comes out. The oats should start browning slightly. Set aside
Add butter in a pan and heat till it melts. Add honey, sugar, vanilla essence and water and heat till the mixture starts bubbling up.
Now add the roasted oats, cornflakes and nuts mixture and combine well until the honey mixture evenly coats the oats-cornflakes-nuts mixture.
Keep a butter paper ready. Spread the mixture using a spoon to ¼ or ½ inch or desired thickness. Trim the sides to form a square or rectangle. Cover it with another butter paper and press them down gently.
Allow to cool for 5mins and then cut into bars. Store them in airtight container.

Serve with a cup of milk or as an any-time Crunchie Munchie !!! I am serving this as a breakfast energy bar along with a cup of milk & banana / oats porridge.

So thats it Folks...
With Love,

Signs off!!! Have a great weekend !

Interested!!! Click to read more...

Wednesday, July 6, 2011

Stuffed and Baked Milagai Bajji

After my successful attempt on the paneer stuffed Milagai Bajji, I wanted to experiment a lot with these bajjis but my newly-diet-conscious-turned hubby is totally against it. He says no to anything fried and poor me is always in a desperate hunt for oil-free recipes… Found the baked version of these bajjis somewhere sometime back (damn my memory I am not able to give credit to the blog!!!) and immediately jumped on it… Not yummy like the fried ones but as they say “Something than nothing” we had something to munch-on for our evening snack.


~*What U Need*~

For the stuffing

Potato – 1
Fresh Peas – ¼ cup

Garam Masala – ¼ tsp

Salt – to taste

Chilli powder – ¼ tsp / as needed

Coriander leaves – 1 tbsp
Oil

Milagai Bajji – 2


How I Made it
Clean and cook the potatoes for 3 whistles in a pressure cooker.
Peel and mash it without any lumps.
Pressure cook the peas for 2 whistle or till half done.
To the mashed potatoes add the garam masala, chilli powder, coriander leaves and salt and mix well.
Combine the fresh peas to this. Don’t over mix or the peas will break.
Clean the bajji milagai and de-seed as shown in this post.
Stuff the masala into the milagai.

Brush oil all over the skin.
Bake this in a preheated oven at 170 C for 15 mins or till the skin in wrinkled and done.

Serve hot with ketchup with a hot cup of coffee or any cold drink !!!

We had it with Cold creamy rose milk. The hot bajjis and cold milk complimented each other very well...

Wanna cup !!!! :)

This goes to Fast Food not Fat Food event held by Vardhini at Zesty Palette originally started by Priya of Now Serving


Interested!!! Click to read more...

Wednesday, June 22, 2011

Baked Masala Potato Wedges

We had planned to go out for lunch but my sweet huss announced at 12.30 am to be precise "Its scorching out. Do you really want to go out for lunch" GRRRRRRR... But yeah, even I didn't feel like going out in the hot sun. So I had to make a quick lunch. I was already starving and the announcement increased my hunger and tickled my taste buds. I wanted to have something spicy and tasty.
So we made Veg n Egg Mixed fried rice for which you can find the recipe here and these spicy potato wedges. I saw this recipe here who had taken the recipe from here. We don't get rosemary here in Chennai and hence I substituted it with dried Kasurimethi leaves.

~*What U Need*~
Medium Sized Potatoes - 2
Crushed kasurimethi leaves - 1 tsp

Garlic cloves - 3

Homemade Curry Powder - 1 tbsp

Olive Oil - 2 tbsp

Salt as needed


How I Made it:
Cut the potatoes into wedges.
Crush the garlic cloves finely.
Mix oil, spices and salt in a deep bowl.
Dump the potato wedges into the spice-oil mix and turn so that the mix coats the potatoes equally.

Spread in a single layer on a baking pan
Grill for 15 mins or till the potatoes turn soft.

Serve hot with rice / as an evening snack.


Interested!!! Click to read more...
Blogging tips
.