Showing posts with label Digestive Biscuits. Show all posts

Thursday, February 12, 2015

Mango Cheesecakes with Mango Glee

Well Valentine's day is around the corner and you will be having that uncanny feeling to do something nice and romantic to conquer your man. And what better way than food or to be more precise desserts. I have been getting a few requests to share dessert ideas that have no chocolate in them. Well not my kind but I liked the idea. Valentine's day is all about chocolates but this year I thought of taking the road less traveled and in comes mango. These mango mini cheesecakes are the perfect end to your valentines day dinner and what is great about them is that these are make ahead desserts. Grab one and share it between your love and all is well in the world.

This recipe doesn't make too much of cheesecake which is fine for us but if you are feeding a large crowd then triple the recipe and bake in a 8 inch or 9 inch springform pan. Also if are a fan of portion control then make them into cupcakes. All you need to do is reduce the baking time to 18-22 mins.


Prep time: 15 mins; Cook time: 25 mins; Makes: 3 mini cheesecakes

~*What U Need*~
Graham cracker crumbs - 3/4 cups
Unsalted butter - 3 tbsp, melted

For the filling:
Mango puree - 1 1/4 cup
Cream cheese - 8 oz, room temperature
Sugar - 1/4 cup
Sour cream - 1/4 cup
Lemon juice - 1 tsp
Egg - 1
All purpose flour - 2 tbsp

For the Mango glee
Mango puree - 1/2 cup
Lemon juice - 1 tsp
Water - 3 tbsp
Gelatin powder - 1 tsp

How I Made it:
Preheat oven to 350°F. In a medium bowl add melted butter and crumbs and stir until evenly moistened. Press the crumb mixture firmly onto the cheesecake pans. Bake for 6-8 mins or until golden brown. Cool completely.
For filling:
Lower the oven temperature to 300F. Beat cream cheese, sour cream, sugar , salt, and lime juice in large bowl until smooth. Add egg and beat well. Add flour and combine. Add the mango puree and beat until well blended. Pour evenly into the springform pans. Bake for 30-35 mins. The edges will be set but the center might have a slight jiggle. Cool completely.

Sprinkle gelatin over the water and allow to bloom for 5 mins. Add mango puree, lemon juice in a saucepan and bring to boil. Once it starts boiling add gelatin and combine very well. Set aside for cooling for about 15 minutes. Then gradually add glee over the cooled mango cheese cake. Refrigerate uncovered overnight.

Serve chilled!!!

So thats it Folks...
With Love,

Signs off!!!


Interested!!! Click to read more...

Friday, January 9, 2015

New York Style Cheesecake

Baking a perfect New york style cheesecake has always been in my to do list. I love cheesecakes and the pumpkin pie cheesecake from Starbucks is a must have whenever I visit the place. There is something about cheesecakes that makes me crave for another bite. New york style cheesecakes are known for it denseness and richness. It is not difficult to make a cheesecake but it is difficult to make one without a cracked surface. Temperature plays a major role in getting that perfect cheesecake. You will be baking at a very low temperature till the batter sets with a slight jiggle. Perfect on its own, cheesecake can also be served with a sour cream topping or berries of choice. Most of the recipes that I came across uses 4 cream cheese packages which sounded too much for us and so I scaled down the recipe to suit our needs.


~*What U Need*~
Graham cracker crumbs - 3/4 cup
Melted butter - 3 tbsp
Sugar - 1 tbsp

For the filling:
All purpose flour - 2 tbsp
Sour cream - 1/2 cup
Vanilla extract - 1/2 tbsp
Cream cheese - 2(8 ounce) packages
White sugar - 1/2 - 3/4 cup
Whole milk - 1/3 cup
Eggs - 2
Lemon juice - 1/2 tbsp
Lemon zest - 1/2 tsp
Orange zest - 1/2 tsp

How I Made it:
Preheat oven to 300 degrees F. Lightly grease the bottom and sides of a 8-inch springform pan. Mix graham cracker crumbs and melted butter in a bowl until evenly moistened. Press crumb mixture into the bottom and about 1/2-inch up the sides of the springform pan. Beat cream cheese till smooth. Add the sugar and whisk well. Add eggs one at a time, stirring well after each addition. Beat in the flour, sour cream, and vanilla extract. Stir in the milk. Stir in lemon zest, and orange zest and whisk until just incorporated. Pour mixture into prepared springform pan.

Bake in the preheated oven until the edges have nicely puffed and the surface of the cheesecake is firm except for a small spot in the center that will jiggle when the pan is gently shaken, about 1 hour. When the cheesecake is done, turn off the oven and let it cool in the oven for 3 to 4 hours. This prevents any cracks from forming on the top of the cheesecake. Cool completely and refrigerate overnight.

Slice and serve.


So thats it Folks...
With Love,

Signs off!!!

Interested!!! Click to read more...

Monday, September 1, 2014

Banana Pudding Ice Cream | Easy Icecream recipes

I am part of this cooking challenge where we share two secret ingredients every month and cook a dish using one or both of the ingredients. This month I was paired with The Food Samaritan a.k.a Amrita Iyer who gave me 'banana' and 'condensed milk' as the secret ingredients. I was thrilled with the choice cos I knew what I would prepare immediately. This icecream has been in my mind for a long time because I loved the flavors(not the regular chocolate or vanilla) and the ease in making the icecream. The huss was totally thrilled with the icecream and so was pappu. A total winner, I would say.

Adapted from here
~*What U Need*~
Sweetened condensed milk - 1 can/14 oz
Banana cream Jell-o Instant pudding - 1 pk/3,4 oz
Banana - 1, sliced
Heavy cream - 2 cups, 1 pint
Peanut butter - 1/2 cup
Chocolate syrup - 1/2 cup
Digestive biscuits - 1/2 cup, chopped(I used ragi biscuits)

How I Made it:
Whisk Jell-o into sweetened condensed milk. Stir in sliced banana and digestive biscuits. Beat the cream until stiff peaks form.

Fold the whipped cream into the sweetened condensed milk mixture. Layer 1/3rd of the icecream in your icecream bowl, place dollops of peanut butter on top, drizzle chocolate syrup, repeat with the rest of the mixture finishing with the icecream. Freeze overnight.

Serve topped with fudge sauce!!!

So thats it Folks...
With Love,

Signs off!!!

Interested!!! Click to read more...

Monday, July 28, 2014

Strawberry Cheesecake Icecream

Be it summer or winter icecreams are always welcome at home. Pappu loves 'iceseem' to the core. And whenever he wants a scoop he goes to the refrigerator and says "kadaa thora iceseem kudu". Thats open the door and give me icecream in our native language. Thats how much he loves his icecream. Well, I am no less. Now coming to this flavor, I love icecream, hubby loves cheesecake and pappu loves strawberries. So combining the three into an icecream for the season sounded just right.

To say that I am totally in love with this icecream is an understatement. I am mad about the flavor pairing. I steal a scoop whenever I pass by the refrigerator and I steal from the kid's share too. The icecream is creamy, slightly tangy and the itsy bitsy white chocolate graham crackers adds to the texture... 

~*What U Need*~
Strawberries - 8 oz, hulled, sliced
Cream cheese - 5 oz
Heavy Cream - 1 cup
Lemon juice - 1/2 tbsp
Sugar - 1/2 cup

Strawberries - 2 oz, Hulled And Finley Diced
Sugar - 1 tsp
Honey Graham crackers - 3 sheets
White chocolate - 1/4 cup
Heavy cream - 1 tsp

How I Made it:
In a blender, puree the strawberries, cream cheese, cream, lemon juice, sugar and salt. Pour into a stainless bowl and place in the freezer. After 1 hour, take the container out and whisk to break all the ice crystals. Repeat this for every half an hour till the icecream is frozen.

For the mix-ins:
In a small bowl combine the strawberries and sugar, mix well and place in the refrigerator. Melt the chocolate chips in a double boiler with the cream. Cover the graham crackers with melted chocolate and place in the freezer. Once completely frozen, chop into pieces. Before the final cycle of whisking the icecream add the strawberry and graham cracker pieces. Freeze till completely frozen...


Scoop and serve!!!

So thats it Folks...
With Love,

Signs off!!!

Interested!!! Click to read more...

Wednesday, May 7, 2014

Mocha Mousse Pie | Dessert for two

Life is all about how you make your decisions. There are those that you love, and there are those that you hate and then there are those that you regret. And that one decision you make can change you and your course of life too. One thing that I have learnt from life is that never ever ask someone else to make that decision for you. Decide for yourself and go for it. Even if something miserable happens you know who has to take accountable for. I have always "put my ball in someone else's court" and there are decisions which I am happy of and there are a hell lot of decisions that I still regret of. I am in another such situation now and I have still haven't made up my mind. But I have been giving a lot of thinking lately. Just wish me luck and I will let you know when things fall in place.

I will talk about this pie in a minute but lets talk about our latest obsession. Its the french silk pie from Baker's square. We are totally insanely obsessed with their pies that its becoming a regular monthly activity. Things had to be taken into hand when the huss was adamant in getting a pie for some i-forgot-what-it-was reason. Since it was just the two of us I scaled down the recipe to a 6-inch pie. You get a taste and you donot have to pump all the excess calories from that of a regular sized pie. Now lets talk pie and all I have is two words for you, "extreme mocha goodness", well not two words!!!

~*What U Need*~
Semi sweet chocolate chips - 3/4 cup
Heavy whipping cream - 1 cup + 1/4 cup
Instant coffee - 1/2 tbsp
Confectioner's sugar - 1/4 cup
Vanilla extract - 1 tsp

For the crumb:
Nila wafers - 1 1/2 cups
Melted butter - 1/4 cup

To decorate
Chocolate syrup, almonds, chopped reese cups

How I Made it:
Process the wafers in the food processor to crumbs. Pour melted butter and pulse few times. Press into a 6-inch pie pan and bake in a preheated oven at 350F for 10-12 mins or till golden brown. Cool completely. Scald the cream till hot. Add the coffee and mix well. Pour over the chocolate and allow to melt for 10 mins. Whisk till smooth. Set aside to cool. Using a stand mixer or electric beater beat the cream to soft peaks. Add the sugar and vanilla and beat to stiff peaks. Set aside 1/4 of the cream for garnishing the pie. Gradually fold the chocolate mixture into the cream. Pour into prepared pie crust. Spread with reserved cream mixture. Garnish as desired. Chill overnight in the refrigerator.

Slice and serve.

So thats it Folks...
With Love,

Signs off!!!

Interested!!! Click to read more...

Monday, March 17, 2014

Cheesecake sourcream Cupcakes | HBC #10

I first thought that I would skip this month's challenge. But the cheesecake cupcakes looked so cute to be left out. This month's HBC challenge was set by Siri of the brave cook and it was quite an adventurous collection from whoopie pies to macarons to layered neapoliton cakes to this cheesecakes. The huss and I are suckers for cheesecakes and we have our fair share from the Cheesecake factory or bakers square every month.

So these cheesecake cupcakes are not exactly the ones from the challenge but improved to accommodate that ingredients which I had in my pantry. The cream cheese had somehow skipped my mind during grocery shopping and all I had was only half a block of cream cheese which was actually the remnants of a dip that I had made. I knew that running to the grocery store was out of question and so I decided to replace the lost amount with some sour cream. I added the zest of an orange cos I love the sweet note that orange gives to anything baked. As for the topping, all I had was some orange jam which I have been saving for the couronne thats been long time in my mind and so I made my own jam. Thanks to the freezing that I did in summer, I still have loads of blueberries, raspberries and cherries on hand.


Adapted from here
~*What U Need*~
Philadelphia cream cheese - 4 oz
Light sour cream - 1/3 cup
Granulated sugar - 1/4 cup or more
Vanilla extract - 1/2 tsp
Grated orange zest - 1/2 tsp
Egg - 1, room temperature
Vanilla wafers - 6, I used nila

For the raspberry jam:
Raspberries - 1/2 cup, I used frozen
Sugar - 3 tbsp

How I Made it:
Preheat oven to 350F. Place a paper cupcake liner in each of 6-cup muffin pan. Place a vanilla wafer, flat-side down, in each muffin cup. Beat cream cheese until fluffy. I used my stand mixer. Add sour cream and beat well. Next in goes the granulated sugar and vanilla extract. Beat till smooth. Add the egg beating well after adding.

Add the orange zest and mix well. Spoon cream cheese mixture over wafers. Bake for 20 minutes. Allow the cupcakes to cool completely.

In a medium saucepan, take the raspberries and sugar and cook till it reaches jam consistency. Cool completely and top each cheesecake with 1/2 tbsp of the jam.

Serve chilled!!!

So thats it Folks...
With Love,

Signs off!!!

Interested!!! Click to read more...

Thursday, December 20, 2012

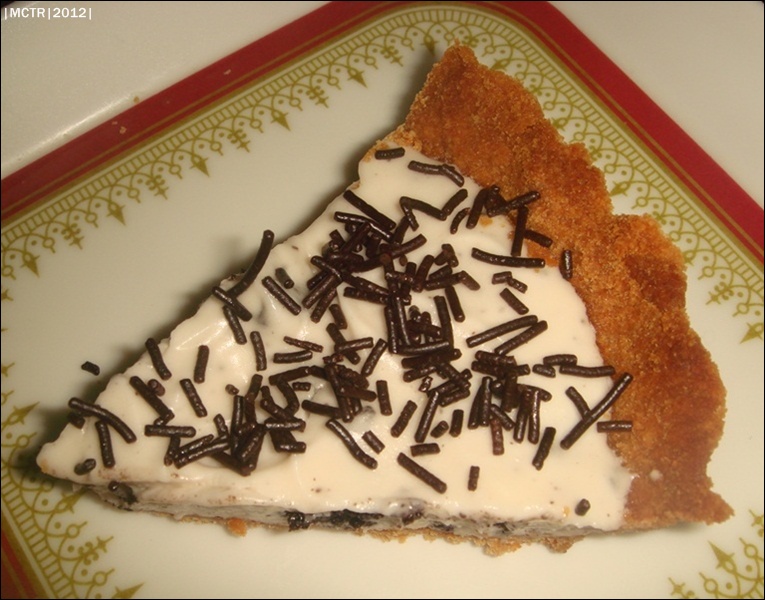
White Chocolate Oreo Cookie Mousse Pie | Easy Dessert Ideas

Ask Mr.A which is his favorite of my cooking, he won't give a second thought in saying "the melt-in-the-mouth chocolate mousse pie". He loves it to the core and whenever I ask him "Do you want me to make anything special for you?", he just asks me to make THE pie. Yes, he calls it "the" pie to give it that extra credit.


A melt in the mouth white chocolate mousse with itsy-bitsy oreo crumbles all together in a (digestive) cookie base

Now that I have made the same pie countless times, I have started experimenting by incorporating new elements and different flavors in the mousse. And that is how I came up with this decadent dessert. I would say it was too sweet and not-my-kind... but it was fit for the huss who is an absolute sweet- tooth mouth. This was made sometime back and was re-visited again to be improved as Peanut Butter Mousse Oreo-Crust Pie which I made for our anniversary. He was delighted with the flavor variation and with him being a PB fan, it has become his favorite now.

Make this easy peesy pie when you are running out of time and when you have friends over. You can make this the day before also and chill it overnight.

~*What U Need*~
For White Chocolate Oreo Cookie Mousse
White chocolate, melted - 1/4 cup
Powdered Sugar - 2 tbsp
Fresh cream - 3/4 + 1/2 cup
Oreo cookies - 5 to 6, chopped

For Cookie Base
Digestive biscuits - 1 packet
Butter - 2 - 3 tbsp

Chocolate vermicelli - to garnish

How I Made it:
Cookie Base:

Blitz the digestive biscuits along with the butter and sugar. Adding the sugar is purely optional. You can do this if you are a complete sweet-tooth. Else skip it. I skipped adding sugar. Press this dough into a tart pan firmly. Bake it for 10 mins or till it turns golden brown.

White Chocolate Oreo Mousse:
Chill the mixer blades and bowl at least for half an hour. Whip 3/4 cup of the cream adding the sugar slowly and increasing the speed gradually till it stands in peaks.
Melt white cooking chocolate using double boiler or in the microwave oven at high for 1 minute checking every 10 seconds. While still warm, add the 1/2 cup cream, and combine well. Add the whipped cream and fold in gently. Add the chopped oreo cookies and fold.
Dump the mousse onto the cookie base and level it. Refrigerate for 2-4 hours.

Slice and Serve!!! When serving, sprinkle chocolate vermicelli on top or crumbled oreo cookies.

So thats it Folks...
With Love,

Signs off!!!

Interested!!! Click to read more...

Monday, November 19, 2012

No-bake Nutty Dates Chocolate Balls / Laddoos | Healthy in every bite

Next in series is this easy peesy Dates laddoos which I made for Diwali. I wanted to add something healthy to the sweet gifts that I gave out to neighbors and friends and thats when I tried this healthy no-cook, no-bake and fuss-free recipe. It has no specific recipe and you can be as creative as you can, adding stuff as you go about the process and all you need is only your blender. How cool is that. And by creative, I say chuck in anything that you think would give some flavor like some tutti frutti or dark chocolate chips (when you knead)... Why not try adding some roasted, salted peanuts... worth a try na??? And wat more... you can get ideas from your kids and you will love spending time with them in the kitchen.. oh they give you the bizzarest of the bizarre combination. (come on, don't worry about the cleaning part, enjoying quality time is what matters.)

It was a winner with the seniors and they loved the fact that it had no sugar added to it... A couple of whizzes in the blender and you have a winner recipe.
This is not a festive recipe but can be made anytime... Chill them and cut them into bars and you have a perfect energy bar to boost up your day. A laddoo in your kid's daily snack dubba and you have no worries that your kids are not having their quintessential daily nutrients. Tweak the recipe as per your needs, as per the nutrients you want to incorporate.


~*What U Need*~
Pitted Dates - 1/2 cup
Walnuts - 8 to 10
Drinking chocolate - 1 tbsp
Digestive biscuits - 2
Dessicated coconut - to roll

How I Made it:
Add dates into your blender and run till chopped coarsely. Add the drinking chocolate and give it a pulse. Next add the walnuts and run the blender till you get a coarse but well blended mixture.

Remove into a wide bowl. Chop the digestive biscuits, add this to the dates mixture and knead till incorporated. Pinch small balls, roll them between your palms, and then in dessicated coconut or cocoa powder.

Chill and serve.

** My Notes:
** You can skip the cocoa powder and replace it with dessicated coconut.
** You can replace the walnuts with nuts of your choice.
** You can also the toast the nuts to add an extra crunch.
** You can roll them in cocoa powder or chopped nuts too.
** You can also dip them in melted chocolate. Kids will love it.

Sending this to Fast & Quick Healthy dishes held at Life with Spices from Priya's Versatile Recipes

...and Show me ur hits @ Divya's Culinary journey originally started by Sangeetha from Spicy treats


So thats it Folks...
With Love,

Signs off!!!

Interested!!! Click to read more...

Saturday, September 29, 2012

Simple 'Single Serve' Biscuit Pudding | Digestive Biscuits in a Chocolate Custard Pool

Hi guys, hope you are having a great weekend... I have one question to ask you guys. How many have you eaten or are eating the age old Milk Bikis biscuits dumped in milk till they are soft even today? All my childhood days I have had biscuits like this only just like a toddler does. Even today whenever I have cookies, if I have some milk by the side, then the cookie automatically gets a dip in the milk. Nothing can beat this way of eating biscuits.

This dessert has been inspired from that way of eating biscuits. I replaced the milk with a simple chocolate custard and substituted digestive biscuits in place of milk bikis. This is something similar to the biscuit pudding sans the multiple layering and dipping in coffee decotion ~ a simpler version of the biscuit pudding. You can use any kinda biscuits but I preferred Digestive cos they get soaked up real quick.

I made a single serving since only I like to eat biscuits dunked in milk. 'A' has an aversion to this habit of mine. I don't know how he grew up as a kid without eating biscuits like this. But this quantity given here can serve two. If you are too selfish put everything in a single bowl and have it just for yourself or split it between two bowls.

~*What U Need*~
Serves - 2
Cocoa Powder - 2 tbsp
Corn flour - 1 1/2 tbsp
Milk - 1 cup
Sugar - 1 1/2 tbsp

Digestive biscuits - 4
Cocoa powder - to dust
Chocolate vermicelli
White chocolate

How I Made it:
Lets prepare the custard first. Mix cocoa powder and corn flour with 2 tbsp milk without forming lumps. Set this aside.

Heat milk and sugar in a pan until boiled and sugar dissolves. Add the cornflour + cocoa mixture and keep stirring till smooth and thick, around 2-3 mins. Allow to cool.

In a serving glass, add 1 layer of the chocolate custard, sprinkle cocoa powder, place a biscuit, spoon some more custard on top and sprinkle with cocoa powder. Repeat layers till desired finishing with the custard.

Dust cocoa powder, sprinkle chocolate strands and grate some white chocolate on top. Refrigerate for 4-5 hours.

Serve chilled.

** My Notes:
**This amount gives a tad bit of bitterness which I preferred. But decrease the cocoa powder content to 1 1/2 tbsp if you prefer it sweeter.
** You can also add 1/2 tsp vanilla essence to the custard.

So thats it Folks...
With Love,

Signs off!!!

Interested!!! Click to read more...
Blogging tips
.