Showing posts with label Pista. Show all posts

Tuesday, November 18, 2014

Easy Rasmalai | Ricotta Rasmalai | American rasmalai

Sweets are my weakness but I am not a sweet tooth. Well thats confusing, I know. Let me explain. I am not a person who is in desperate need of a dessert after every meal but when there is an availability I enjoy it to the fullest. I love gulab jamun with icecream and gajar ka halwa with ice cream and then there is rasmalai for which I am the greatest fan on earth, the one thing that I craved for during and after pregnancy. This recipe is the cheat's method to make rasmalai. Well it can never scale up to the original version where you have to knead the chenna, cook it and then dunk it in the ras . But for the 30 mins of labor that you put in, it yields good flavors.


~*What U Need*~
For the cheese discs:
Whole milk Ricotta cheese - 15 oz
Sugar - 1/4 cup
Cardamom - 2

For the ras/syrup:
Evaporated milk - 1 can
Sweetened condensed milk - 1/4 cup
Whole milk - 1/2 cup
Sugar - 2 tbsp, ground with 2 cardamom
Cashews, Almonds, pista - 1/4 cup, coarsely chopped

How I Made it:
Pre-heat the oven to 350 F. Powder 1/4 cup of sugar and cardamom and mix them with ricotta cheese. In a muffin pan, divide this mixture equally and bake for 20- 25 minutes until it is set. Let cool completely, and remove from pan.

To make the syrup
In a sauce pan, boil the evaporated milk , whole milk. Simmer on low flame and add the condensed milk and sugar. Simmer till the desired consistency is reached. Add the nuts, mix well and cool to room temperature. Add the cheese discs and chill overnight.

Serve chilled!!!


So thats it Folks...
With Love,

Signs off!!!

Interested!!! Click to read more...

Wednesday, November 27, 2013

Rasmalai | Diwali Sweet Recipes

First let me share a very exciting news. I ordered a Kitchen-aid Professional stand mixer yesterday. Yessss, a brand new one, a shining empire red one, one which I have been longing to own ever since I started baking. Its due to arrive between Dec 3 and Dec 6 and the wait is just killing me. I will share photos as soon as I get it.

Now lets talk about the diwali sweet recipes that I have been posting decades late. Okay here's the deal, I swear that this is the last of my diwali posts. Well, I still have one more but that is a guest post for a loved one but that is the end of the series. Finally, right?? I am sorry, truly for dragging it so long but I have been left with no other option. Blogging is just not what my son and I want rite now which leaves me to the fact that I have to sit late nights, which is not what I want. 2 hours is all that I can spend for the blog these days and that just doesn't seem enough.

But then you don't need it to be Diwali to indulge in sweets right? And when it is a rich juicy one like this rasmalai, all you need is a simple reason to pop one in your mouth, like the day is bright and sunny, why don't I have a rasmalai. Atleast that was our case (where our = me+pappu). Since it was my first time, I tried it using half a litre. That is me, I always use the smallest possible quantity for the first test batch that I run. But the recipe could be easily doubled or tripled as per convenience.


~*What U Need*~
Whole Milk - 2 cups
Lemon Juice - 1 tbsp
Ice cubes - few

To Make syrup:
Water - 1 3/4 cups
Sugar - 3/4 cup
Cardamom powder - 1/8 tsp
Pistachios/Cashews - to garnish

For Rabdi:
Milk - 1/2 litre or 2 cups
Condensed milk - 1/4 cup
Cardamom powder - a pinch
Saffron threads - 1/8 tsp soaked in warm milk
Pistachios, almonds, cashews - chopped, 2 tbsp
Ghee - 1 tsp

How I Made it:
Bring milk to a boil and then set to medium flame. Add lemon juice and stir well. Keep stirring till the milk solids separate and the whey water is clear. Remove from heat, add the icecubes or place this in a cold water bath. I added icecubes.

Take a clean cotton cloth, pour the curdled milk and collect the whey water. Wash the chhena in running water to remove the lemon smell. Squeeze the excess water and hang it for 30 mins. After 30 mins, the chhena should be crumbly in texture. Knead well till it forms a smooth dough, say 5-10 mins. Make flattened discs or balls of desired size. I made small balls for pappu's sake.

Heat water in a deep wide bottomed vessel, add sugar, cardamom powder and keep stirring till sugar dissolves completely. When it starts boiling, put it to medium heat, and slowly add the balls. Place the lid and cook for 10-12 mins till the balls are doubled in size. Immediately remove the balls and place them in a pan with cold water. This is done to stop the balls from cooking more. Cool both the rasgullas and the sugar syrup completely, add the rasgullas to the syrup and chill in the refrigerator overnight.

Now lets make the rabdi. In a small saucepan, add 1 tsp ghee and fry the nuts till brown. Once brown, add the milk and boil. Add the crushed cardamom and boil till reduced to half.

Add the saffron soaked milk and boil. Now add the condensed milk and boil till the milk is thick and syrupy. Squeeze the rasgullas gently to remove excess sugar syrup and then drop into the rabdi. Give it a boil and then remove from heat. Chill overnight.


Serve chilled.!!!

So thats it Folks...
With Love,

Signs off!!!

Interested!!! Click to read more...

Friday, November 1, 2013

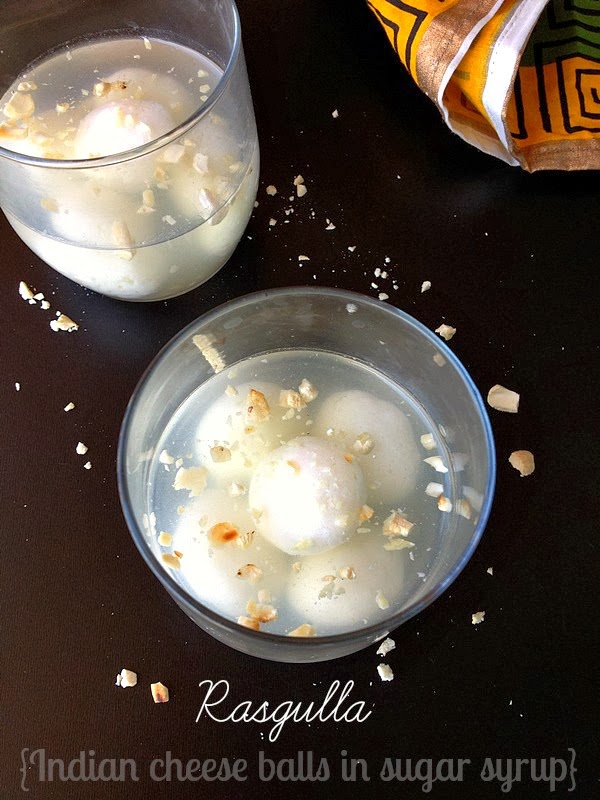
Rasgulla | Bengali Rasgulla | Easy Diwali Sweets

Advance Diwali Wishes to ally my readers!!!Let the festival of lights fill your days with joy, fun and happiness.

That being said, its just like any other day for us. No crackers, no family and no sound!!! And so there is no Diwali feel. We have been enjoying sweets but that longingness to be in your homeland among friends and relatives is there. I miss the early morning crackers, the diya lighting, the non-stop tv programs, Adyar Ananda Bhavan sweets and more of all the biryani that amma makes on Diwali. Other than the small pot-luck party that few friends over here have arranged there is nothing special here.

Thanks that the occasion falls on a weekend, atleast we will be together for the day. And so I have been making plans for lunch and dinner. Vadakari and dosa is the huss's favorite and that is definitely gonna be there for breakfast. Lunch has to be none other than pressure cooker biryani, my version of my MIL's chicken masala and finally ending it with a sweet note. I have made a big batch of rasmalai and it is there chilling in the refrigerator stewing in all that flavored milk. Dinner might be light with some chicken tandoori, naan bread and pickled onions. I still have to make sweets and savories to distribute to neighbors and friends and that is gonna be tomorrow's task... And there goes the schedule for another hectic weekend.

Coming to this recipe, I made this last weekend when the huss's friend came over to visit us. I served him this chilled as dessert after a hearty meal of biryani and he said that it was a perfect way to end the lunch. The balls were soft and melt-in-the-mouth kind filled with all that sugary syrup. Since this is my first time, I used only 1/2 litre of milk but the next time I make it, it is definitely gonna be a bigger batch. I missed taking the pictures for few steps but I will update a detailed post in the rasmalai recipe which is up next.

Prep time: 20 mins; Cooking time: 25 mins; Makes - 10 mini

~*What U Need*~
Whole Milk - 2 cups
Lemon Juice - 1 tbsp
Ice cubes - few

To Make syrup:
Water - 1 3/4 cups
Sugar - 3/4 cup
Cardamom powder - 1/8 tsp
Pistachios/Cashews - to garnish


How I Made it:
Bring milk to a boil and then set to medium flame. Add lemon juice and stir well. Keep stirring till the milk solids separate and the whey water is clear. Remove from heat, add the icecubes or place this in a cold water bath. I placed in an ice bath.

Take a clean cotton cloth, pour the curdled milk and collect the whey water. Wash the chhena in running water to remove the lemon smell. Squeeze the excess water and hang it for 30 mins. After 30 mins, the chhena should be crumbly in texture. Knead well till it forms a smooth dough, say 5-10 mins. Pinch balls of desired size and smoothen them out.

Heat water in a deep wide bottomed vessel, add sugar, cardamom powder and keep stirring till sugar dissolves completely. When it starts boiling, put it to medium heat, and slowly add the balls. Place the lid and cook for 10-12 mins till the balls are doubled in size. I missed taking a picture of this. But you can see the difference in size right!!!

Immediately remove the balls and place them in a pan with cold water. This is done to stop the balls from cooking more. Cool both the rasgullas and the sugar syrup completely, add the cashews and chill in the refrigerator overnight.
Serve chilled!!!

** My Notes:
** Do not discard the whey water. I use it to make chapathis which makes them super soft.
** Give room for the rasgullas to breathe. Do not overcrowd the pan.
** Always serve chilled.
** Adding ice cubes to the pan stops the chhena from overcooking and so does placing the cooked rasgullas in water.
** Also cook the rasgulla balls in medium flame. Donot let the syrup to boil and as this might lead to cracks.
** It generally takes 10-12 mins for the rasgullas to cook.
** Be careful when removing the cooked rasgullas as they are so soft at that stage.
** I missed taking step by step pics for the icecubes part and adding the uncooked rasgullas but I will update them in my rasmalai post.

So thats it Folks...
With Love,

Signs off!!!

Interested!!! Click to read more...

Monday, October 28, 2013

Khoya Burfi | Easy Diwali Sweets

After the vacation trip, getting back to normal is becoming emotional for me. And the dipping mercury levels is an added reason. I so wish that I am always with family. I know that this is just an aftermath of meeting friends and family and things are gonna be just like before as days pass by but I just can't get that clinging feel of loneliness out of my mind. In fact I have been diverting myself with shopping. Yeah, I have been winter shopping, prop shopping and bakeware shopping.

Yesterday I went to Walmart and I grabbed a mini angel food cake pan, a doughnut cutter and some Christmas cookie cutters and I have no idea when I am gonna use it. And today I have been rummaging through the bin to get hold of that receipt so that I can return it. To put things in short, I think I am out of my mind and am out-of-the-world lonely. Well, hope things change soon cos I think I am driving the huss a teeny-weeny bit crazy too.

Coming to today's recipe, remember the homemade khoya that I posted last week. This is what I made with the khoya, khoya burfi. Its sweet, its fudgy and its an easy sweet that could be made for Diwali, and super easy if you buy khoya from the store or follow shortcuts to make khoya at home (which I will share soon). As for the texture, it was just like store bought, a bit crumbly. BTW I didn't add curd to get that texture, my khoya didn't dissolve completely and that must be the reason. As for why my khoya didn't dissolve, I think I made it too dry and crumbly. But thanks be to that cos we love our burfis to be crumbly and not too smooth. But if you are a fan of smooth burfis then do not make your khoya too dry.

Prep Time: 5 mins; Cooking time: 15 mins; Makes - 7-8 pieces

~*What U Need*~
Khoya - 1 cup
Sugar - 1 cup
Cardamom seeds - 1/8 tsp, crushed
Milk - 2 tbsp
Ghee - to grease
Cashews/pistachios - to garnish

How I Made it:
Crumble the khoya, sugar and milk in a non-stick pan. In medium flame, mix well to dissolve.

Now add the crushed cardamom seeds and keep mixing till it forms a mass and leaves the pan without sticking. Grease a pan with ghee, pour the mixture into the pan and level with a greased spatula. Allow to cool and cut into desired shapes. Garnish with pistachios or cashews.

Serve with love!!!

** My Notes:
** You could add saffron soaked in milk to get kesar burfi.
** My khoya was dry and crumbly and so the khoya did not dissolve properly. If so don't panic, just go ahead in the process. You will get burfis just like the ones you get from stores, fudgy and crumbly.
** Cook the khoya till it leaves no trial of water when swirling around the pan. If you feel that it has some water content, then return to the pan, heat for some more time and then make pieces.
** Keep refrigerated but always serve at room temperature.

So thats it Folks...
With Love,

Signs off!!!

Interested!!! Click to read more...

Sunday, April 28, 2013

Apple Pom Salad with Sweet & Sour Dressing | Cold Salad Recipes

Its been a long time since I posted a salad recipe in my space. All credits to the huss. The huss has never been a salad person except for the Cold Apple&Candied walnut salad that I serve occasionally. But the salad sans the candied walnuts is a strict no for him. Says the only good thing in the salad is the crunchy sweet walnut thingies. Its just the opposite for me. I heart salads. I can have them any time of the day. The freshness and the crunchiness that you get without devouring the soul of the ingredients is what I love about salads. I don't prefer a fancy dressing, a simple olive oil or red wine dressing is all that I need.

Talking about the recipe, I made this when there were an overload of apples and the huss was fussing over the not-so-tasty lunch that I made for the day. He wanted something sweet, said he and that is when I made this salad. It was sweet, mildly tart and the crunchiness of the toasted pistachios and peanuts made him miss the candied walnuts. We had this for tea, skipping the tea part... and we loved it.

~*What U Need*~
Apple - 1, cubed
Pomegranate - 1/2
Honey - 1 tbsp
Lemon juice - 1/2 tbsp
Hung curd - 1/4 cup
Roasted Pistachios, groundnuts - 8 each

How I Made it:
Cube the apples and put them in lemon water to prevent browning. In a mixing bowl, add honey, lemon juice, yogurt till smooth. Add the apple and pom seeds and toss. Pound the roasted pistachios and ground nuts coarsely. Place the salad in serving bowls, top with nuts.

Serve cold.

** My Notes:
** Use nuts and fruits of choice.
** U can skip the lemon juice.
** This is a guilt free salad but if you are serve it to kids then spoon over some melted white chocolate, chill to get a hard shell and then serve.

So thats it Folks...
With Love,

Signs off!!!

Interested!!! Click to read more...

Monday, December 24, 2012

Overnight Christmas Fruit Cake | Merry Christmas

Jingle bells... Jingle bells... Jingle all the way... Yaaayyyy... its carols and merriment everywhere. and so it is here in my space too. Merry Christmas to all my readers.
I spent half of my school days in a Christian school and hence I am very much tied to the season. I had sung carols and played 'Mother Mary' in the nativity play. I still remember the tune of all the carols and I love everything Christmassy. Carols, fruit cakes, and not to forget Santa claus are all a part and parcel of my childhood memories. When I told the huss that I am making a rum soaked fruit cake for Christmas, he simply asked my "Why are you going Christmassy?" I might not have my roots stuck to the religion but cakes and celebration know no religion and so does the individual (...and thats me) who eats cakes. Now the huss was not against the thought and all he needed at the end was his portion of the rich rum soaked cake.

I actually planned to make the cake few weeks back, allow it to age brushing rum every other day and finally have a bite on Christmas. But then nothing goes as per my plan these days and with the huss flying abroad, I didn't find any reason to make the cake and so didn't soak any fruits and nuts before-hand. I whipped the batter after repeated requests from my huss. Just go by the plan, he said. So finally pulled myself together and made this overnight fruit cake.

I already have a fruit cake in my space but I prepared that using fruits soaked in red wine for a month. This is a keeper if you have not pre-soaked your fruits. It is no less in flavor and tastes fruity and delicious. I suggest let the cake age for atleast 3 days, the flavor intensifies as days go by. I had mine aged for 3 days.

~*What U Need*~
All purpose flour - 1 cup
Icing / confectioner's sugar - 1/2 cup
Demerera sugar - 1/4 cup
Butter - 100 gms
Eggs - 2, separated
Vanilla extract - 1/2 tsp
Baking powder - 1/2 tsp
Cinnamon powder - 1/4 tsp
Ginger powder - 1/8 tsp

Black raisins - 1/2 cup
Dates - 1/2 cup, chopped
Tutti frutti - 1/4 cup
Cashew nuts - 1/2 cup

Orange flavored rum - 1/2 cup, divided

For the Caramel syrup:
Sugar - 3 tbsp
Water - 1 1/2 tbsp
Boiling water - 1/4 cup

How I Made it:
Lets make the caramel water first. In a small pan, take the sugar and water and swirl. Heat in medium flame until the sugar turns deep amber, add the boiling water and mix till the caramel has dissolved. Set aside. In a pan, add 1/4 cup rum, dates, raisins, tutti frutti chunks and cook everything in medium flame till the dry fruits have moistened. Finally add the cashews, cook till the rum is absorbed. Put this in an air tight container, add the remaining rum and leave it overnight.

Preheat the oven to 170 C. Sieve the flour with cinnamon powder, ginger powder and baking powder. Set aside. Beat together the butter and sugar in a bowl until it turns creamy.

Add one egg yolk at a time and beat till well blended. Add the flour little by little and beat together. Add the vanilla extract and caramel syrup and blend well. Add the fruit and nut mixture to the mixing bowl and gently mix it with a spatula.

Grease well a round baking pan with butter and keep aside. Beat the egg whites in an another bowl with a pinch of salt until it turns fluffy with soft peaks. Fold the egg whites into the cake batter gently. Pour this cake batter to the greased baking pan and bake for 45-50 minutes or a skewer inserted comes out clean. Remove the cake from the oven and allow it to cool completely. (..sorry missed to click these pictures)

Serve dusted with icing sugar.

** My Notes:
** U can replace demerera with brown sugar too.
** I used a mix of broken cashew nuts, sliced almonds, chopped pistachios and chironji nuts
** You can use any type of rum or brandy. I used orange scented Bacardi rum
** If you want a non alcoholic version, substitute rum with orange juice or apple juice. Orange juice works best
** The cake tastes best when aged. Wrap in cling film or aluminium foil and store.
** I aged mine for 5 days. It was then cut and packed off for relatives. Will try to update the post with a cut piece the next time I make this.

So thats it Folks...
With Love,

Signs off!!!

Interested!!! Click to read more...

Monday, December 3, 2012

Instant Kesar Doodh Peda | Diwali Sweet Recipes

Traditionally doodh pedas were done by reducing milk to a solid consistency, sweetening it and then forming desired shapes. Wheeew, that really needs time and most of all patience... Both of which I lack these days. There are many fail-proof recipes that are floating around which uses short cut methods to make these yummies and the main point is that you cannot question the taste too. Some use khoya, some milk powder and condensed milk while some use just condensed milk.

Here I have used milk powder and sugar... I didn't have condensed milk in my pantry and was searching for a recipe which uses only sugar when I landed @ Sangee's space. You can never go wrong with this recipe and the only step where you need to be careful is in melting the sugar. Add the milk powder after the sugar melts completely or else you will get sugary bits when eating 'em. Also once the milk powder has dissolved in the sugar, remove the pan from the flame. Excessive heating will result in hard pedas. I added saffron dissolved in milk and hence the shelf life is less. But I don't think these beauties will last more than a day, alleast not for us!!!

~*What U Need*~
Milk powder - 1 cup
Sugar - 1 cup
Saffron strands - 1/4 tsp
Warm milk - 1 tbsp
Butter - 2 tbsp
Broken nuts - to garnish

How I Made it:
Soak saffron strands in warm milk for 10 mins. Heat a non stick vessel, add 3 tbsp water and sugar, and stir well. Allow the sugar to dissolve completely. Add the milk powder and stir well.

When done, add the warm milk+saffron and butter and mix well. Allow to cool not fully but hand-bearable**(see notes). Make balls, flatten and garnish with nuts of choice.

Delicious doodh pedas ready.

** My Notes:
** String consistency of the sugar is not necessary.
** You can skip the saffron and add cardamom powder instead.
** Since we have added milk, the shelf life is less. So consume in one day.
** Just when the mixture started to cool, the lil one started wailing and I had to move away. The mixture had cooled fully by the time I was back and had hardened. So added a few more drops of milk, kneaded and then shaped them. So take care that you shape them once you can manage the mixture with your bare hands.
** Grease your hands before shaping.
** I halved the recipe and got nearly 6 medium sized pedas.

So thats it Folks...
With Love,

Signs off!!!

Interested!!! Click to read more...
Blogging tips
.